Jumpers are small devices that are used to control the operation of hardware devices directly, without the use of software. They have been around since the very first PCs, and are still used on many types of modern hardware today. A jumper consists of two primary components:
Jumper: The jumper itself is a small piece of plastic and metal that is placed across two jumper pins to make a connection, or removed to break a connection. They come in a few standard sizes (and some non-standard ones I'm sure); only one or two sizes are commonly seen on PCs. Jumpers are sometimes also called shunts.
Jumper Pins: A set of pins, across two of which a jumper is placed to make a specific connection.
Note: Some people actually call the jumper pins the "jumper"; others call the pins plus the jumper a "jumper". The terms are used rather loosely, but it's nothing to worry about.
A jumper is a mechanical switch that is easily modified by hand. Essentially, it's a circuit that has been broken intentionally and a pin placed on each end of the broken connection. Placing a jumper across two pins connects them electrically, completing the circuit; removing a jumper from a set of pins breaks the circuit. Hardware engineers allow users to configure devices or change their operation by creating different sets of pins that implement different functions depending on how the jumpers are set. When power is applied to the device it detects which circuits have been closed or opened. The most common place where most folks see jumpers are in hard disk drives and motherboards. On hard disks they are typically used to tell the hard disk what role to play on the hard disk interface cable; on motherboards they control as many as a dozen different settings related to how the motherboard functions. Usually these jumper settings are printed directly on the hardware for convenience.
The main advantage of using jumpers for controlling hardware is that they are simple and straightforward: if you get the settings correct, the hardware (assuming it is not defective) will perform as it should. What you see is what you get. The biggest disadvantage associated with using jumpers is the fact that they require physical manipulation. If you need to change a jumper, you have to physically open the PC to access the device, and that's not always easy to do. The jumpers are also very small and easily lost if you are not careful. Also, you have to make these changes with the power off. These issues are one reason why the effort was made a few years ago to move away from jumpers on hardware devices and towards software configuration of hardware using techniques such as Plug and Play.
Jumpers are given many different designations. On motherboards, it is common to see them numbered, using a sequence such as "JP1", "JP2", etc. For some functions, jumpers are treated as a group--multiple jumpers must be placed on particular sets of pins to enable or disable a specific function. The documentation that comes with any hardware device should tell you how to set its jumpers to control various functions; if you don't have the documentation, check the manufacturer's web site.

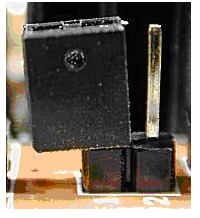
A group of jumper pins on a motherboard, showing three jumpers connected and two sets of pins "bare" (no jumpers attached).Note the "JP7" and "JP15" labels in the foreground
One problem experienced by many who work with hardware occurs when a jumper needs to be removed from a set of two pins to disable a function: what do you do with it? Some keep a big "box o' miscellaneous hardware" for jumpers and similar small items, but since the jumpers are small and easy to lose, one trick that is often used is to "dangle" the shunt by connecting it to only one pin. Since the second half of the shunt is disconnected, this is electrically equivalent to removing it altogether, and ensures that it will always be there for you the next time you need it.
A jumper "dangled" from a set of pins. This is electricallyequivalent to removing the jumper entirely.
No comments:
Post a Comment